
If you’re here, you’re probably already using Circle.so (also Circle), or you’re considering it for your community.
So, you’re wondering about Circle.so Workflows. What is it? How do you create a workflow? How can you use it to improve your community?
To answer these questions, we’ve crafted this comprehensive guide to Circle’s Workflows feature. Here we’ll discuss what the feature is, how it works, the possible use cases, and more.
Let’s begin!
What Is Circle Workflows?
Circle Workflows is a community management tool that lets you automate tasks to simplify community management, deliver personalized member experiences, and scale your community while saving you time and money.
It supports two types of workflows—Automation and Bulk Action.
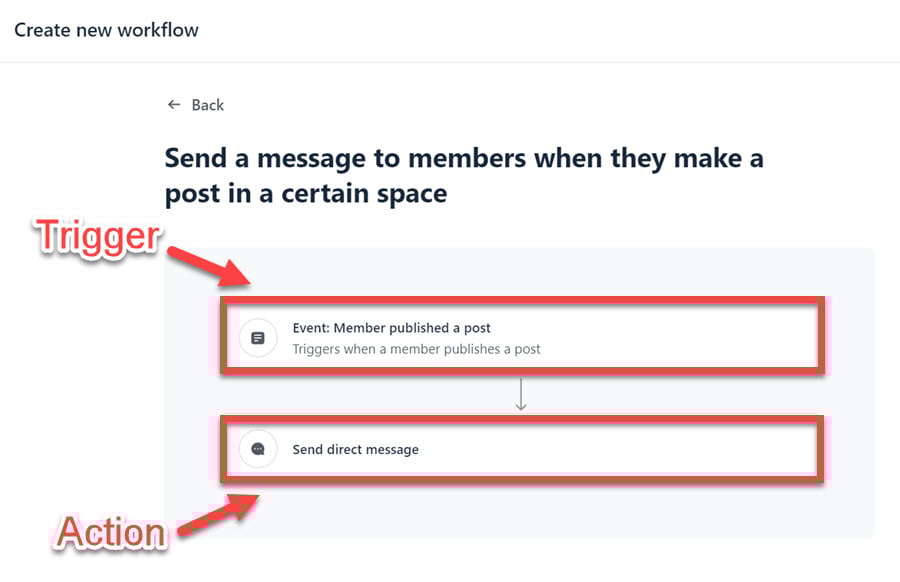
An automation workflow lets you automate specific tasks in your community by using triggers and actions. You can think of these as “if-this-then-that” statements, where a trigger is a specific event (e.g., a member joins your community), and an action is the response to that event (e.g., sending them a message).
Here are some examples of automations you can create in Circle:
- Send a welcome message when someone joins your community
- Send a direct message to a member when they create a post
- Tag a member when they complete a course
Bulk actions, on the other hand, enable you to take action on a group of members at once quickly. You can also schedule future actions and even set up recurring actions to save time and effort.
With bulk actions, you can define the precise segment of members by applying filters. You can then choose from a variety of actions, such as adding or removing tags, sending emails, and canceling subscriptions.
Circle is the only major community builder to offer a feature like Workflows. From community management to member engagement, it allows you to do more with less effort.
The only thing to keep in mind is that Workflows is a premium feature and requires the Business or Enterprise plans to use.
Now, let’s create our first workflow together, shall we?
How to Set Up a Circle Workflow
Before creating a workflow, ensure that you have a Circle account and your community is set up. If you’re unfamiliar with the platform, our detailed Circle tutorial will guide you through the process.
If you already know how to use Circle, setting up a workflow is straightforward. Start by clicking on your community’s name in the top left corner of the screen, then select Workflows.
Here you can create your first workflow by clicking the New Workflow button in the top right corner of your screen.

This will open a new window where you’ll see premade workflow templates. You can select one of these or start from scratch.
You’ll also notice that each template has a label—automation or bulk action. As we mentioned above, these are two different types of workflows.
You should use the automation option if you want to create a workflow that responds to an event and performs an action based on that. On the other hand, bulk actions let you perform a task immediately or by scheduling (no trigger needed).

While the workflow templates make your life easier, we’ll create a custom workflow in this tutorial to help you get a better picture of how this feature works.
To create a custom workflow, click the Custom Workflow button and select the Automation option on the next screen.

This will open the workflow editor, where you’ll be able to define the trigger and actions.
Circle has dozens of triggers, and here are some of the most popular ones:
- Member joined community
- Member joined space
- Member published a post
- Member posted a comment
- Member completed course
- Tag added to member
Because we want to send a welcome message when a member joins a space, we’ll select Member joined space as the automation trigger. Also, make sure to choose a particular space.

After that, you need to select what you want to happen when a member joins a space. In this case, we want to send a message automatically.
To do that, click Add an action, select Send a direct message, and add text to the message body.

Circle has several actions, as well, and here are the most common ones:
- Add member to space
- Remove member from community
- Add member tag
- Send mobile push notification
- Cancel paywall subscription
- RSVP member to event
Moreover, you can add multiple actions to the same workflow. So, in the example above, when a member joins a particular space, you can automatically send them a welcome message and also assign a tag to them.
And to do that, all you have to do is click on the Plus icon below the first action box and select the desired action.

Once you’re finished setting up your workflow, make sure to click the Activate button in the top right corner of the screen.
Now, let’s quickly show you how to create a bulk action workflow to send a message to members interested in attending a particular event.
Follow the same steps as before, but select the Bulk Action option this time.

For bulk action workflows, you need to segment your audience and then decide what you want to do.
Circle has several filters to help you precisely define your audience segment. You can filter your audience based on multiple criteria, including member roles, spaces, tags, events, activity score, last login date, etc.
For this example, we’ll set the member role filter along with a filter for events and select the particular event.

Now, in the Action box below, again select Send a direct message and fill out the From and Message Body fields.
All that’s left is to start the workflow by clicking the Run Now button in the top right corner of the screen.
Now, let’s show you how to create a scheduled workflow.
Create a workflow again but select the Scheduled option in the custom workflow window.
Scheduled workflows work the same as the bulk actions, so follow the same steps to define the segment of members you want to target and choose the action you want to perform.
Now, click on the Schedule button and select the one-time or recurring option.

For one-time actions, simply select the date and time and schedule the action.
For recurring actions, you can choose the frequency (e.g., daily, weekly, monthly) and set the start and end dates for the action.

This is how you create workflows in Circle. As you can see, it’s a straightforward process, and you can do so many things with it, which is what we’ll explore next.
Use Cases of Circle Workflows
Now, let’s explore some practical scenarios in which you can create workflows to automate administrative tasks and improve member engagement within Circle communities. Look, the possibilities with Workflows are endless, so we’ll try to cover the more popular use cases.
1. Send a Welcome Message to New Members
If you want to create a personalized onboarding experience for your new members, you can create a workflow that automatically sends them a welcome message (action) once they sign up for your community (trigger).
The trigger, in this case, will be “Member joined community“, and the action will be Send a direct message. You can include a personalized welcome message, point them to the video tour of your community, or even include download links for Circle apps.

You don’t have to stop here—you can add more actions:
- RSVP the member to your weekly new members’ meet-up event
- Add new members to one or more spaces so that you don’t have to do that manually
2. Tag Members When They Like a Specific Post
Another example of an efficient workflow is to tag members based on their activity, which will help you segment your audience and send them content and offers they’ll be interested in.
For this workflow, the trigger will be Member liked a post, and all you have to do is specify the post for which you want to track member likes.

To make this example less abstract, let’s say you have a post teasing a new online course. You can use this workflow to tag all members who like the post and send them personalized messages and content promoting the course.
3. Congratulate Members on Completing a Course
Workflows can also be a powerful engagement tool for your Circle courses. You can reward and recognize your students’ achievements. And there’s even a pre-built template you can use for that.
You’ll find the Congratulate members when they complete a course template under the Engagement tab.
You’ll notice that this template has one trigger and two actions, i.e., when a member completes a course (trigger), you can message them directly (action 1) and add a member tag (action 2).

Your message can be anything from a simple congratulations to thanking members for participating in your community.
And with member tags, you’ll have a list of all members who completed a particular course. You can send them a certificate of completion or share a discount coupon for another course. The options are almost limitless.
4. Send a Reminder Message About an Upcoming Event
Circle offers three workflows related to events, two of which are Automations, and one is a bulk action.

You can use the second template—Send a message to members when an event is about to start—to easily achieve this.
That’s not all you can do:
- Send a message to members when they RSVP to an event
- Send reminder messages at multiple intervals before the event
- Send a bulk message to event attendees post the event
5. Follow Up With Inactive Members
It’s important to engage with your members and make sure they’re getting the most value out of your community. But what about those who have gone inactive?
Circle lets you filter your audience based on their last login date, so you can create bulk action to message them directly and remind them to come back. You can also send a push notification to their mobile devices if they have the Circle app installed.

Finally, you can create this as a recurring action as well, so you can continuously follow up with inactive members and encourage them to become active again.
6. Duplicate Members to Another Space
You can also create workflows to save time on repetitive tasks, and here we’ll talk about adding members from one space to another.
To do that, you can use Circle’s bulk action template, Duplicate members from one space to another.
Once you open the template, you’ll see the option to set audience rules and select the space from which you want to move members.

The audience box will already have your audience filtered by role. You only want to move members, not moderators and admins.
You should then select the space from which you want to duplicate members and add any other audience rule to make your selection more precise. For example, you can move all members from a selected space with a particular member tag.
Then, in the action box, you should select the space where you want to move members over, and that’s it!
Final Thoughts on Circle Workflows
To wrap it up, Circle.so Workflows is a versatile tool that can be used for reducing manual work, as well as to better connect with your members and create more personalized experiences for them.
In this guide, we covered the basics of Workflows, including how to use them and some practical examples you can apply in your own community.
If you’ve still not signed up for Circle, you can start a 14-day free trial (no credit card needed) to start using Workflows.
We hope you enjoyed reading this guide, and if you have any questions, we’d love to hear them.


