
Podia is an excellent choice for hosting a membership site, but with so many moving pieces, building one can quickly get overwhelming.
If you’re considering building a Podia membership site but don’t know where to start, this guide will be perfect for you.
We’ll cover everything you need to know about Podia’s membership features and a step-by-step guide on creating one from scratch.
Let’s start by highlighting the qualities that make it a great option for membership sites.
Why Is Podia a Great Option for Membership Sites?
Podia is a versatile platform with a wide range of tools to support your membership site. Let’s go through the features that make it stand out as a membership software.
Support for Multiple Product Types
On Podia, you can publish and sell multiple types of products. More specifically, as a creator, you can offer:
- Online Courses
- Digital downloads
- Webinars
- Bundles
- Coaching

By sharing your expertise and knowledge through multiple formats, you’ll make your membership site and content more engaging and exciting for the members.
Native Community Tool
Another feature that makes Podia an excellent platform for hosting a membership site is its native community feature.
A community is a great way to enable discussions in your membership, offer your members help when they need it, and thus create a more sustainable connection between your brand and them.
Apart from discussions, you can use the community tool to deliver exclusive monthly content to your members.
Flexible Subscription Pricing Options
When it comes to membership sites, another one of Podia’s strengths lies in its flexible pricing options.
You can choose to charge monthly or yearly for access. Plus, you can offer a free trial period for your membership.
Another great thing about Podia’s pricing options is that you can easily create multiple membership tiers. You can create as many plans as you need and select which products to include.

Powerful Marketing Tools
Podia gives you access to a suite of marketing tools, which you can use for promoting your membership site.
These include:
- Sales page builder
- Coupons
- Affiliate marketing
- Email marketing
- Global sales taxes
- Live chat
You can use these tools in different ways. For example, using the affiliate marketing feature, you can create a program to encourage others to share and promote your course in exchange for a commission.
So these were some of our favorite Podia features. If you want to analyze the platform in more detail, check out our in-depth Podia review.
Now, let’s show you how to set up your Podia membership site.
1. Set Up Your Membership Community
The first step in creating a membership website is to set up your community. In Podia, the community acts as the base of your membership site.
You’ll use it to facilitate discussions and deliver monthly content, but your membership pricing plans are also attached to the community.
To get started, you’ll need to go to the admin dashboard. If you’re already subscribed, you just need to log in to your account. Otherwise, you’ll first need to sign up for a free trial.
To create a community, select Community from the main menu in your admin dashboard.

Podia creates a community for you out of the box. You just need to configure the community settings and adjust its access and visibility. To do that, go to Settings from the community area.
First, enter the basic details for your community, including a name, description, and brand image. You can also upload a community banner and select default topics, which all your members will be able to access.

The next step in setting up your community is creating topics. Podia allows you to create topics, which you can use to keep your community organized and also offer private subgroups.
To create a new topic in your community, click All topics in the community menu and select + New Topic.

Then, give your topic a name and a brief description, and choose the image. Following that, you can manage the topic’s access settings.
If you want all tiers to access the topic, you can make it Open. Otherwise, you can make it Private and select the correct pricing plans.
For example, suppose coaching calls are available only on the highest membership tier. In this case, you can create a topic called Coaching Calls and only grant access to that tier.
You can make all your members follow a topic automatically or leave it to them to choose whether to follow it or not.
We recommend that you create a separate topic for organizing your monthly content. This is an excellent way to keep all your ongoing content in one place. You can even create topics based on certain themes.

To create a new post, click the New Post option on your community homepage, write your content, choose a topic and publish the post.
What we like about Podia’s community feature is that you can’t just add text posts but can also upload video content, making it suitable for delivering ongoing membership content.

Finally, your community includes a member directory, where you can see a list of all the community members and search through it. You can also send direct messages to them.
After you’ve customized all these settings, your Podia community will be ready for members to join. You can now move on to creating additional products to include in your membership site.
2. Create Additional Products
As mentioned previously, Podia supports many types of products so that you can create different offerings as part of your membership.
To create a new product, go to the admin dashboard, select Products, and click + New Product at the top right corner of the screen.

Podia will then ask you to name your product and choose a product type. Here you can create an online course, a digital download, a webinar, or a coaching session.
To demonstrate the process, let’s choose an Online Course as it’s the most popular product type for membership sites.

The first step in creating a new online course is building the curriculum. To do that, you first need to add a section.

Next, you can add lessons to your section. Podia supports multiple lesson types, including video, text, quiz, and embed types.
If you want to add a video lesson, select Add files and upload your video file. That’s it, and your video lesson will be ready.

You need to repeat the whole process to create the complete course structure.
While we used the online course example to demonstrate how to create a product in Podia, you can similarly create other products.
Once done, you can set up your membership pricing and include access to these products.
3. Create Membership Plans
Membership pricing is tied to your community in Podia. You can have multiple plans and select which products to include in each.
To create a new membership plan, go back to the community and select Settings. Then, scroll down to the bottom of the screen.
Here you’ll see the section with existing plans if you have any. Otherwise, you’ll just see the button + New Plan. Click on the button to create a new tier.

You’ll see the option to name your plan, provide a brief description, and add a relevant image.
You can then add the pricing. You can offer monthly and yearly subscriptions and choose to grant as many free days as you’d like.

After settling the initial details, you can move on to selecting the products you want to include in this membership. You can choose from any published products on Podia and have as many of them as you’d like in your membership plan.

After this, you can adjust the plan’s availability. For example, you could make it available to purchase on your site and in checkout embeds, or you could make it unavailable for sale.
As mentioned previously, in Podia, you can create multiple membership tiers. If you wish to create more plans, go back to community settings and repeat this process.
Once you’re happy with your membership plans, you can move on to building a membership sales page.
MORE ON PODIA
4. Build a Sales Page for Your Membership
The last step in creating a membership site on Podia is building a sales page. Your sales page is where your visitors will find all the information about your offering and can go to the checkout page to make a purchase.
To create a sales page, click on the user icon in your admin dashboard and select Edit Site.

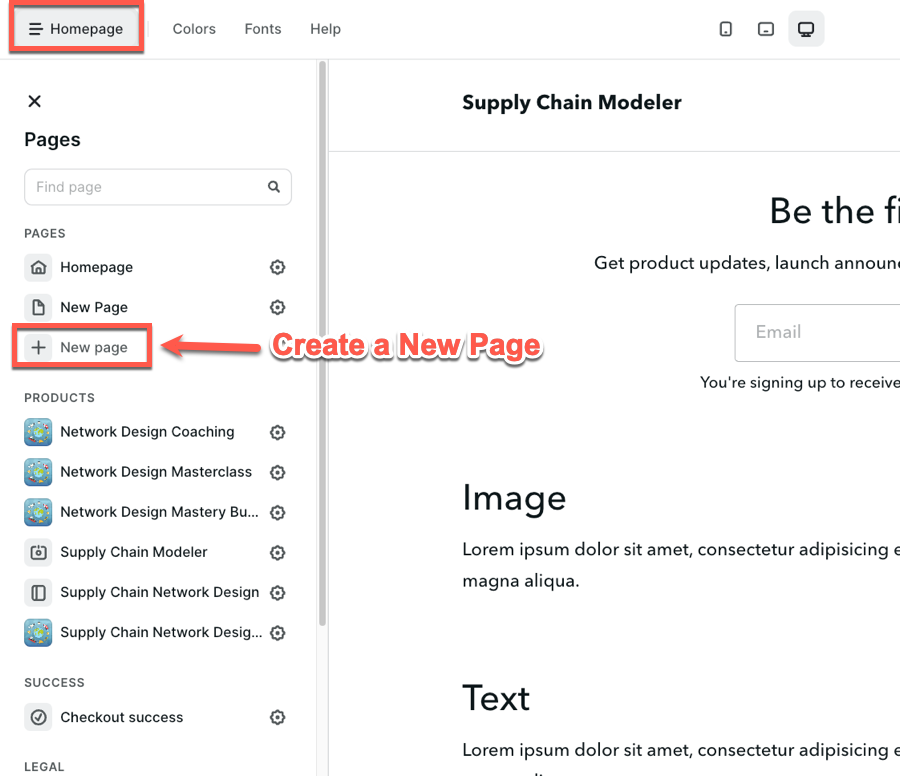
Then, click on Homepage at the top left corner of the screen and click on New Page. This will create a blank page and open the page editor.
To add a new section, click the round + icon, and you’ll see the options for all Podia page sections. These include sections for Text, Image, Video, Features, FAQs, Testimonials, etc.
Let’s show you how to create a video-based banner area with a call to action. For that, we’ll use the Video section.

First, you need to add content to the page section. Here you can upload your video file, add the main title and descriptive text, and add a button to link to the checkout page.

Next, you need to design your hero section. For that, go to the Design tab. Here you can modify the layout and the appearance of the section.
For example, select the second layout option to show the video on the right. Similarly, select the Light Theme if you want a light-colored background. You can also add a background image.

Next, let’s add a pricing section to your sales page. To do that, click the + icon again and select the Plans section.
Using this section, you display all or some of your membership plans and their details on your sales page.

Again, you can edit the layout and appearance of this section by going to the Design tab.
This is how you can add and customize page sections. Podia’s page builder is super easy to use, and you can quickly create a good-looking sales page by following the steps above.
Once your page is ready, you should check the page settings. For that, click on the gear icon next to the page name. You can then name the page, add a description, change the URL, and add a preview image if you’d like.
After completing your sales page, your membership site is ready to be published.
Our last recommendation would be to go to a private window and check the entire flow before you start sharing it.
You can create a 100% off coupon for yourself and purchase the membership as a customer. This way, if there are any issues in the process or you see something that can be improved, you’ll be able to take care of it before it goes live.
Now, it’s time to start sharing your membership site. Just copy the sales page URL and share it with your audience via your blog, emails, or social media.
Summary
In this guide, we’ve covered all the steps you need to take to create a Podia membership site, from building a community to creating an online course and adding different payment plans for your membership.
Podia has all the essential features you’ll need to run a successful membership website, including powerful marketing tools.
If you aren’t using the platform yet, sign up for a free trial to start using it.
We hope this guide helped you learn how to launch your membership on Podia, but if you still have questions, please leave them down below, and we’ll get back to you shortly.


